Removing backgrounds is an essential skill for any photo editor. It can elevate the quality of your images, making them look more professional and polished. In this guide, we’ll show you how to remove backgrounds like a pro using Adobe Photoshop.
Why Removing Backgrounds is Important in Photoshop?
Before you konw how to remove background in photoshop, we can try to know more about its meaning and blackground knowledge. Photoshop is a powerful tool that provides endless possibilities to enhance and transform images. One of the most common tasks in Photoshop is removing backgrounds. Whether you’re a professional photographer, graphic designer, or simply looking to edit your personal photos, mastering background removal is essential.
Removing backgrounds in Photoshop allows you to isolate the subject of an image and place it on a new background. This technique about how to remove background in photoshop is widely used in e-commerce, where product photos need to be displayed on a white or transparent background to highlight the item and make it stand out. By removing distracting elements from the background, you can draw the viewer’s attention to the subject and create a more visually appealing image.
In addition to e-commerce, background removal is also important in other areas such as graphic design, photo manipulation, and even social media. With the rise of visual content on social media platforms, having high-quality, eye-catching images is crucial for engagement and impact. Removing backgrounds can help you achieve this by creating clean, polished, and professional-looking images.
Understanding how to remove backgrounds in Photoshop opens up a world of possibilities for creative expression and transformation. By mastering this skill, you can enhance your images, create stunning designs, and take your visual storytelling to the next level.
In conclusion, how to remove background in PhotoShop is an essential skill for any creative professional or hobbyist. It allows you to isolate the subject, create a more visually appealing image, and open up a world of creative possibilities. So, whether you’re a seasoned Photoshop user or just getting started, mastering background removal should be at the top of your list.
Understanding Layers and Masks in Photoshop
(photoshopessentials.com)
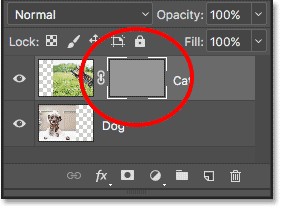
Layers and masks are two essential features of Adobe Photoshop that allow you to create complex compositions and manipulate images with precision. Layers act as transparent sheets stacked on top of each other, while masks are tools that let you hide or show parts of a layer without actually deleting anything.
In simpler terms, think of layers as stacks of paper that you can draw or paint on, and masks as stencils that you can use to reveal or conceal specific areas. This feature is incredibly useful when removing backgrounds from images because it allows you to isolate the subject and work on it separately from the background.
To create a mask, first, select the layer you want to mask. Then, click on the Layer Mask icon located at the bottom of the Layers panel. This will add a white mask to your layer, revealing the entire image. To hide parts of the image, simply paint over the mask using the Brush tool with black color. If you make a mistake, switch to white color and paint to reveal the area again.
Pro Tip: You can also use the Gradient tool to create smooth transitions between different levels of transparency in your mask.
Another powerful feature of layers is the ability to adjust their opacity and blending modes. Opacity controls how transparent or opaque a layer appears, while blending modes determine how the colors of one layer interact with those of the layers below it. Experimenting with these settings can help you achieve unique effects and enhance the overall look of your image.
Understanding layers and masks is crucial for mastering background removal in Photoshop. By using them together, you can create precise selections, refine edges, and seamlessly blend your subjects into new backgrounds. Practice working with layers and masks, and you’ll be able to take your Photoshop skills to the next level!
Using the Magic Wand Tool to Remove Backgrounds in Photoshop
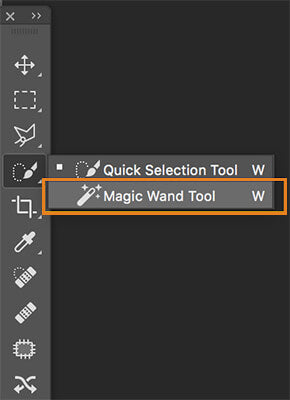
If you’re looking for a quick and easy way to remove backgrounds in Photoshop, the Magic Wand Tool is your go-to option. It’s a powerful tool that can quickly select areas of similar color or texture based on a set tolerance level. This makes it ideal for removing solid color backgrounds like a plain white background.
To use the Magic Wand Tool, simply select the tool from the toolbar and click on the area of the image you want to remove. The tool will automatically select all areas with a similar color or texture within the tolerance level you’ve set. If you need to add or subtract areas from the selection, hold down the Shift or Alt key while clicking.
One important tip to for how to remove background in PhotoShop keep in mind when using the Magic Wand Tool is to adjust the tolerance level carefully. A high tolerance level will select more areas than you intended, while a low tolerance level will not select enough. To find the right balance, start with a low tolerance level and adjust it gradually until you get the desired selection.
Another thing to keep in mind is that the Magic Wand Tool works best on images with a clean contrast between the subject and the background. If your image has a lot of complex edges or shadows, using the Magic Wand Tool may not be the best option.
Overall, the Magic Wand Tool is a powerful and straightforward tool for removing simple backgrounds in Photoshop. It can save you time and effort, especially if you are working with multiple images. However, for more complex images, you may need to use other selection tools or methods to achieve the desired result.
In the next section, we’ll take a look at another useful tool for removing backgrounds in Photoshop - the Quick Selection Tool.
Using the Quick Selection Tool to Remove Backgrounds in Photoshop
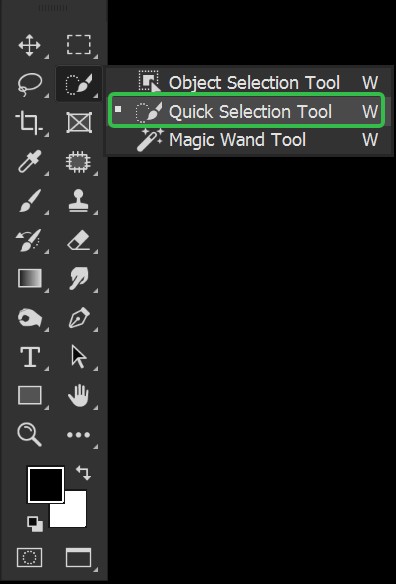
If you’re looking for a fast and straightforward way to remove backgrounds from images in Photoshop, the Quick Selection Tool is your best bet way on how to remove background in PhotoShop. This powerful tool allows you to select an object or person quickly, leaving the background behind.
To use the Quick Selection Tool, select it from the toolbar on the left-hand side of the Photoshop interface. Make sure the layer you want to work on is selected, and then click and drag the cursor over the object or person you want to keep in the image. The tool automatically detects the edges of the object and selects it without selecting the background.
However, if you find that the tool has also selected parts of the background, don’t worry. You can easily remove those sections by holding down the Alt/Option key and dragging the cursor over the areas you want to deselect.
Once you have your selection, you can refine the edges to ensure a cleaner cut-out. Refining the edges helps to make your selection look more natural and seamless. To do this, go to the Options bar at the top of the screen and select the “Refine Edge” button. Here, you can adjust the edge detection settings, smooth out the edges, and remove any remaining background elements.
After refining your selection, you can choose to add a new background or leave it transparent. Adding a new background is as simple as creating a new layer and placing it beneath the cut-out object. You can also experiment with different backgrounds until you find the perfect one for your image.
In conclusion, the Quick Selection Tool is an excellent choice for quick and easy background removal in Photoshop. With a little practice and experimentation, you’ll be able to master this tool and produce high-quality cut-outs that are perfect for any project. So why not give it a try and see how much time and effort you can save?
Using the Pen Tool to Remove Backgrounds in Photoshop
While the Magic Wand and Quick Selection tools are excellent for simple background removal, they can fall short when it comes to more complex images. That’s where the Pen tool comes in. With its precision and control, the Pen tool is the go-to tool for professional graphic designers who need a perfect cut-out.
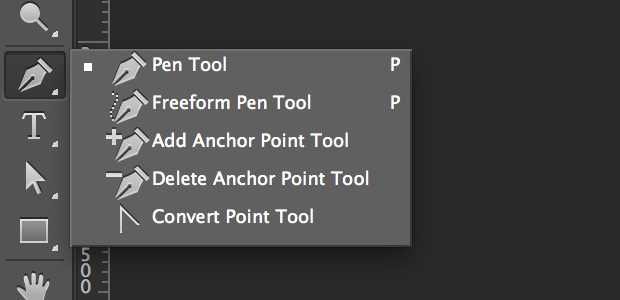
First, select the Pen tool from the toolbar and zoom in on your image. Start by clicking on the edge of the object you want to keep in the foreground, and then click and drag to create a curved line along the edge. Continue doing this until you’ve created a path that follows the entire edge of the object.
Once you’re done creating the path, right-click on it and select “Make Selection.” This will convert your path into a selection that you can use to remove the background. You can also adjust the selection by using the Direct Selection tool to manipulate individual anchor points.
To remove the background, simply hit the Delete key, and the background will disappear, leaving only your object. If you want to refine the edges further, use the Refine Edge tool to smooth out any rough areas.
One thing to keep in mind when using the Pen tool is that it can be time-consuming, especially for complex images with multiple curves and angles. However, the final result is well worth the effort.
In conclusion, the Pen tool is an essential tool for any designer or photographer who needs precise and accurate background removal. While it may take some practice to master, it offers unparalleled control over your cut-outs, making it the ideal tool for professional-level editing.
Refining Edges for a Perfect Background Removal in Photoshop
After using the Magic Wand or Quick Selection Tool to remove the background, you may notice some rough edges around the object. This is where the Refine Edge tool comes in handy.
To access the Refine Edge tool, make sure your object is selected and go to Select > Refine Edge. A dialog box will appear with various options to fine-tune the selection.
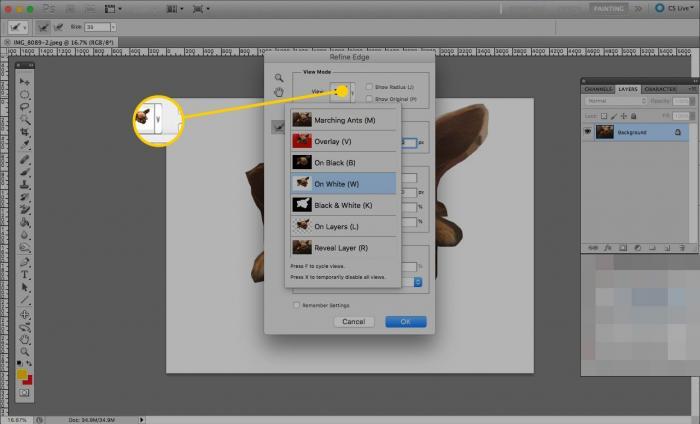
The first option is “View Mode,” which allows you to preview the selection against different backgrounds. Choose the best view mode that works for your image.
Next, adjust the “Edge Detection” slider to refine the edge of your selection. Play around with the slider until you achieve the desired result. You can also use the “Refine Radius Tool” to further refine the edge of your selection manually.
If you notice any leftover background within your selection, use the “Decontaminate Colors” option to eliminate color fringes. Check the “Smart Radius” option and adjust the slider for more precise results.
Once you are happy with your refined selection, click “OK” to apply the changes. You can now add a new background to your image or use it as a transparent overlay.
Here are some tips to keep in mind when refining edges in Photoshop referring how to remove background in Photoshop.
Use a brush with a soft edge to refine areas that need more attention
Zoom in on your image to get a better view of the edges and make precise selections.
Take advantage of the preview feature to see how your selection looks against different backgrounds.
Remember to save your work as a PSD file to maintain the layers and masks.
By mastering the Refine Edge tool, you can achieve seamless and professional-looking background removals in Photoshop. Keep practicing and experimenting with this tool, and soon you’ll be an expert in no time.
Adding a New Background to Your Image in Photoshop
One of the most exciting aspects of Photoshop is its ability to transform an image completely. With just a few clicks, you can change the entire look and feel of your photo by adding a new background.
To get started, select the image you want to edit and open it in Photoshop. Next, create a new layer by clicking on the “New Layer” button located at the bottom of the Layers panel.
Once you have your new layer, choose the background color or image you want to use. You can either select a solid color from the Color Picker or import an image from your files.
After selecting your desired background, drag and drop the layer below the original image layer. You should now see your new background beneath the original image.
If the new background appears too small or large, simply adjust the layer size by pressing “Control-T” (Windows) or “Command-T” (Mac) and dragging the corners to resize it.
But what if the original image has a complex background, making it difficult to remove? Don’t worry; there’s a solution!
Using the Magic Wand Tool or Quick Selection Tool, you can isolate the subject of your image from the background and paste it onto a new layer. This will allow you to add a new background without any distractions.
To do this, select the Magic Wand or Quick Selection Tool from the toolbar and click on the background you want to remove. Once selected, press “Ctrl+J” (Windows) or “Command+J” (Mac) to duplicate the selection onto a new layer.
You can now delete the original image layer and proceed with adding your new background as described above.
With these simple steps, you can completely transform your images and take your creativity to the next level. So, go ahead, experiment with different backgrounds, and let your imagination run wild!
Learn more in our guide on how to remove photo backgrounds with Adobe Background Remover effectively.
Tips and Tricks for Professional Background Removal in Photoshop
Background removal is an essential skill for anyone working with images, whether you’re a professional photographer or just someone who loves to edit photos. While Photoshop offers several tools to remove backgrounds, mastering the technique requires practice and patience. In this article, we’ll share some tips and tricks to help you achieve a perfect background removal in Photoshop.
Use the Refine Edge Tool for Complex Images
Removing the background from an image with complex edges, such as hair or fur, can be challenging. The Refine Edge Tool in Photoshop allows you to fine-tune the selection by smoothing out jagged edges and preserving fine details. To access this tool, select the layer mask and click on the Refine Edge button. Then, use the sliders to adjust the edge detection, smoothness, feather, and contrast until you get the desired result.
Experiment with Different Selection Tools
Photoshop offers several selection tools, each with its strengths and weaknesses. While the Magic Wand and Quick Selection tools are great for selecting simple shapes, the Pen tool provides more precision and control over the selection. Experiment with different tools to find the one that works best for your image.
Use Adjustment Layers to Match Colors and Lighting
If you’re adding a new background to your image, it’s essential to match the colors and lighting to make it look natural. Adjustment Layers in Photoshop allow you to change the color, saturation, brightness, and contrast of the image without affecting the underlying layers. Use a Hue/Saturation, Color Balance, or Levels adjustment layer to match the colors and lighting of the foreground and background.
Save Your Work as a PNG File for Transparent Backgrounds
When saving your work, choose the PNG file format to preserve the transparency of the background. This format is ideal for web graphics and logos that require a transparent background. To save your work as a PNG file, go to File > Save As and choose PNG from the format drop-down menu.
Mastering background removal in Photoshop takes time and practice, but with these tips and tricks, you’ll be well on your way to creating professional-looking images. Remember to keep experimenting with different tools and techniques until you find the one that works best for your image.
Conclusion: Mastering Background Removal in Photoshop
Removing backgrounds in Photoshop is an essential skill for any graphic designer or photographer. Not only does it allow you to isolate your subject and create stunning compositions, but it can also save you time by eliminating the need for manual cutting and pasting.
With the right tools and techniques, you can become a pro at background removal in no time. Understanding layers and masks is crucial for creating precise selections and refining edges. The magic wand tool and quick selection tool are excellent options for simple images, while the pen tool offers more control and accuracy for complex compositions.
Refining edges is a critical step in achieving a perfect background removal, as it smooths out any jagged edges and ensures that your subject blends seamlessly with its new background. Additionally, adding a new background to your image can give it a whole new look and feel, enabling you to create unique and compelling visuals.
To take your background removal skills to the next level, consider utilizing some tips and tricks from the pros. For example, using adjustment layers can help you match the color and lighting of your subject to its new background. Similarly, understanding blend modes can help you achieve a more natural and cohesive composition.
Conclusion: Mastering Background Removal in Photoshop
In conclusion, mastering background removal in Photoshop can be a game-changer for your design work. By learning the right techniques and practicing consistently, you can produce professional-level compositions that stand out from the crowd. So why not start experimenting today and see where your creativity takes you?
Removing backgrounds in Photoshop can seem daunting at first, but with these tips and tricks, you’ll be able to do it like a pro. Remember to take your time and practice on different images to hone your skills. The above is about the method of using PhotoShop to remove the background in image processing.
If you want to know more knowledge, such as edit photo with Picwish or video processing methods, this site also has related articles. You can check this article on how to use the latest series of iPhone 15 or other mobile phones to edit videos by iPhone to study. Learning image and video processing methods allows us to record our lives in more diverse and vivid ways.

